GPU가 필요한 파드가 일반 노드에 배치되어 계속 Pending 상태가 됩니다. 운영팀은 노드 라벨, affinity, taint/toleration을 조합해 워크로드를 맞는 장비에 보내야 합니다. 스케줄링 규칙을 이해하면 비용이 큰 노드와 민감한 워크로드를 안전하게 분리할 수 있습니다.
Node Affinity와 Taint/Toleration — 파드 스케줄링 제어
머신러닝 추론 서버가 일반 CPU 노드에 배치되어 GPU를 사용하지 못하고 있습니다. 반대로 비용이 비싼 GPU 노드에 일반 nginx 파드가 올라가 GPU를 낭비하고 있습니다. 배치 작업용 고메모리 노드에는 일반 API 서버가 올라가 메모리를 독점하고, 실제 배치 작업은 메모리가 부족한 노드에 배치되어 OOM이 발생합니다. Kubernetes 스케줄러는 기본적으로 가용 자원이 있는 노드에 파드를 고르게 분산시키지만, 클러스터가 커질수록 "이 파드는 반드시 이런 노드에 있어야 한다"는 요구가 생깁니다. Node Affinity는 파드 관점에서 "나는 이런 노드를 원한다"고 표현하고, Taint/Toleration은 노드 관점에서 "나는 특정 파드만 받겠다"고 선언하는 상호 보완적인 메커니즘입니다.
- 1NodeSelector로 단순한 노드 선택을 할 수 있다
- 2Node Affinity의 required(필수)와 preferred(선호) 규칙을 작성할 수 있다
- 3Taint로 노드에 파드 접근 제한을 설정할 수 있다
- 4Toleration으로 파드에 Taint 허용을 선언할 수 있다
- 5GPU 전용 노드 설정 실무 패턴을 적용할 수 있다
- 6스케줄링 실패(Pending) 원인을 디버깅할 수 있다
kubectl get nodes --show-labelskubectl describe nodes | grep Taintskubectl label node <노드이름> disk=ssd environment=productionkubectl get configmap kube-scheduler-config -n kube-system 2>/dev/null || echo 'default scheduler'스케줄러가 파드를 노드에 앉히는 법 — 큐에서 바인딩까지 4단계
파드를 만들면 스케줄러가 "이 파드를 어느 노드에 둘까"를 매번 새로 계산합니다. nodeSelector·affinity·taint·toleration은 전부 이 계산에 끼어드는 입력일 뿐입니다. 그 계산이 큐 → 필터 → 스코어 → 바인딩의 4단계로 흐른다는 걸 알면, "왜 Pending이지", "왜 하필 저 노드에 갔지"를 어느 단계의 결과인지로 나눠 볼 수 있습니다.
[Pod 생성]  nodeName 비어 있음 → 스케줄 대상
   │
   ① 스케줄 큐(Scheduling Queue)
   │      (배정 안 된 파드가 쌓이고, 스케줄러가 하나씩 꺼냄)
   │
   ② 필터링(Filter / Predicate)  — "이 노드가 이 파드를 받을 수 있나?"
   │      리소스 requests 수용 · nodeSelector/required affinity 일치
   │      · taint를 견디는 toleration 有 · PV 토폴로지 …
   │      → 통과 못한 노드는 후보에서 탈락
   │
   ③ 스코어링(Score / Priority)  — "남은 후보 중 어디가 제일 좋나?"
   │      preferred affinity(weight) · 리소스 균형 · 이미지 로컬리티
   │      · PodTopologySpread(분산) · anti-affinity …  → 점수 합산
   │
   ④ 바인딩(Bind)
   │      최고점 노드를 Pod.spec.nodeName에 기록
   ▼
[그 노드 kubelet]  컨테이너 생성  (이후는 노드 몫)
각 단계가 무슨 일을 하고, 여기서 어긋나면 어떤 증상인가:
| 단계 | 하는 일 | 여기서 어긋나면 |
|---|---|---|
| ① 큐 | 노드 미배정 파드를 스케줄러가 순서대로 꺼냄 | 스케줄러 자체가 다운 → 모든 새 파드가 Pending, NODE는 <none> |
| ② 필터 | 하드 조건으로 받을 수 있는 노드만 남김 | 후보가 0개 → 영구 Pending. describe에 0/N nodes are available (didn't match node selector · Insufficient cpu · untolerated taint) |
| ② 필터(taint) | toleration 없는 파드는 taint 걸린 노드에서 제외 | toleration 키·값·effect 불일치 → 그 노드가 후보에서 빠져 원하는 전용 노드에 못 감 |
| ③ 스코어 | 남은 후보에 점수 매겨 최고점 선정 | preferred는 가중치일 뿐 → weight 100을 줘도 다른 노드 총점이 높으면 그쪽으로(Pending은 아닌데 엉뚱한 노드) |
| ③ 스코어(anti-affinity) | 같은 토폴로지 중복 배치에 낮은 점수(soft) | required anti-affinity면 필터로 승격 → 분산 못 하면 Pending |
| ④ 바인딩 | 고른 노드를 nodeName에 기록 | 바인딩까지 갔으면 스케줄은 끝. 이후 ContainerCreating 정체는 노드·런타임 문제(스케줄러 아님) |
즉 스케줄링 실패는 어느 단계에서 걸렸는지로 증상이 갈립니다 — Pending에 0/N nodes available이면 ②(필터: 리소스·레이블·taint 중 하나), Pending은 아닌데 원하는 노드가 아니면 ③(스코어: preferred는 보장이 아니라 가중치), 노드는 정해졌는데 안 뜨면 ④ 이후(노드 몫)입니다. kubectl describe pod의 Events가 ②의 사유를 그대로 찍어주고, ③의 '왜 저 노드'는 스케줄러 로그의 노드별 점수로만 보입니다.
NodeSelector: 가장 단순한 노드 선택
Node Affinity 이전에 존재하던 단순한 방식입니다. 노드의 레이블을 키-값으로 정확하게 매칭합니다.
apiVersion: v1
kind: Pod
metadata:
  name: ssd-workload
spec:
  nodeSelector:
    disk: ssd              # disk=ssd 레이블이 있는 노드에만 배치
  containers:
    - name: app
      image: nginx
# 노드에 레이블 추가
kubectl label node node-1 disk=ssd
kubectl label node node-2 disk=hdd

# nodeSelector가 있는 파드 배포 후 배치 노드 확인
kubectl get pod ssd-workload -o wide
# NAME          NODE     STATUS
# ssd-workload  node-1   Running   ← disk=ssd 레이블이 있는 노드에 배치됨
- kubectl get pod <name> -o wide에서 NODE 열을 먼저 확인 — 배치된 노드 이름이 nodeSelector/affinity에서 지정한 레이블을 가진 노드인지 kubectl get node <node> --show-labels로 대조
- STATUS=Pending이고 Events에 "no nodes match node selector"가 있으면 → 해당 레이블을 가진 노드가 0개. kubectl get nodes --show-labels | grep <label-key>로 실제 레이블 보유 노드 수 확인. 0이면 레이블 키/값 오타 또는 미설정
- Taint가 있는 노드에 파드가 배치됐는데 Pending이면 → toleration 키/값 불일치. kubectl describe node <node>의 Taints 항목과 파드 spec.tolerations를 대조 — 키와 값이 정확히 일치해야 함
Node Affinity: required(필수)와 preferred(선호)
ML 추론 서버가 GPU 노드 대신 일반 CPU 노드에 배치되어 성능이 100배 낮아졌습니다. NodeSelector로 accelerator=nvidia-gpu를 설정했지만 레이블 키 오타로 인해 조건이 무시됐고 스케줄러는 아무 노드나 선택했습니다. 또한 노드가 us-east-1a와 us-east-1b에 분산되어 있을 때 특정 zone을 선호하되 전체가 없으면 다른 zone도 수용하는 유연한 조건이 필요한데 NodeSelector는 이를 표현하지 못합니다. Node Affinity는 필수 조건(required)과 선호 조건(preferred)을 분리하고 In/NotIn/Exists 같은 연산자를 지원해 복잡한 배치 전략을 선언할 수 있습니다. 이 CB에서는 GPU 파드 배치 예시로 required와 preferred 조건을 조합하는 방법을 다룹니다. 필수 조건(required)과 선호 조건(preferred)을 분리하고, In/NotIn/Exists 같은 연산자를 사용할 수 있습니다.
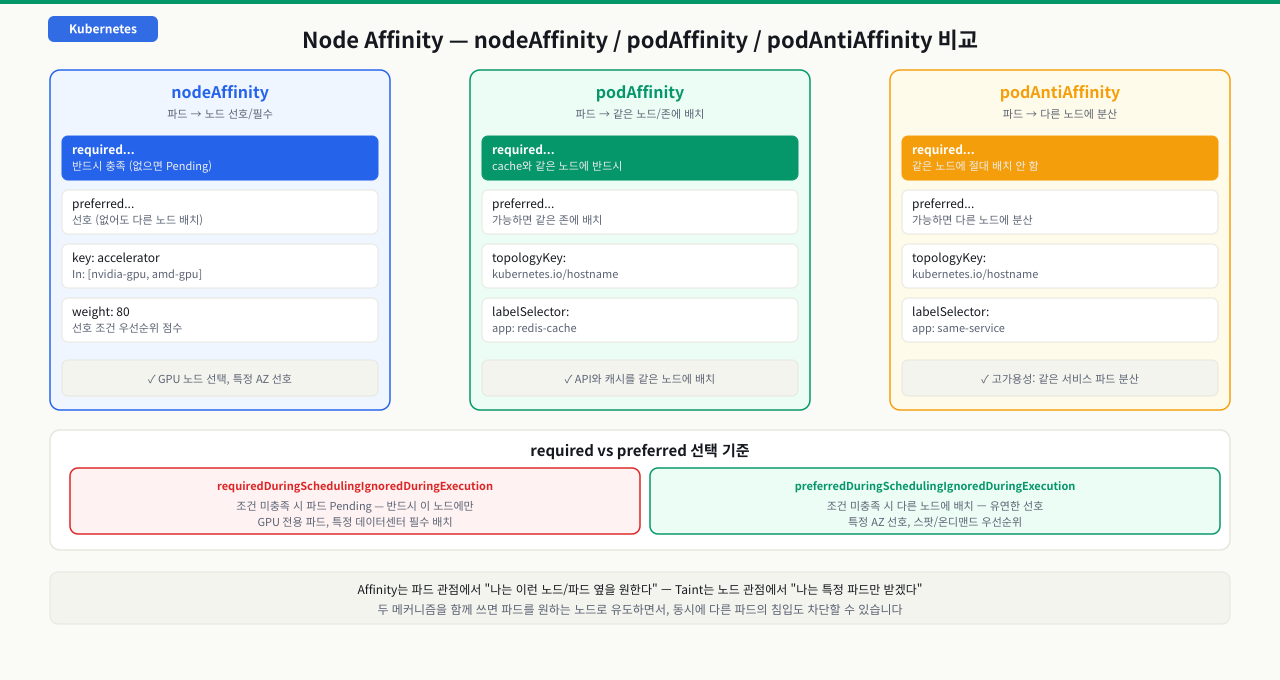 확대
확대
apiVersion: apps/v1
kind: Deployment
metadata:
  name: ml-inference
spec:
  replicas: 2
  selector:
    matchLabels:
      app: ml-inference
  template:
    metadata:
      labels:
        app: ml-inference
    spec:
      affinity:
        nodeAffinity:
          # 필수 조건: GPU 노드에만 배치 (충족 못하면 Pending)
          requiredDuringSchedulingIgnoredDuringExecution:
            nodeSelectorTerms:
              - matchExpressions:
                  - key: accelerator
                    operator: In
                    values:
                      - nvidia-gpu
                      - amd-gpu
                  - key: kubernetes.io/arch
                    operator: In
                    values:
                      - amd64
          # 선호 조건: us-east-1a를 선호하지만 없어도 됨 (weight로 우선순위 조정)
          preferredDuringSchedulingIgnoredDuringExecution:
            - weight: 80
              preference:
                matchExpressions:
                  - key: topology.kubernetes.io/zone
                    operator: In
                    values:
                      - ap-northeast-2a
            - weight: 20
              preference:
                matchExpressions:
                  - key: node-type
                    operator: In
                    values:
                      - high-memory
      containers:
        - name: inference-server
          image: ml-team/inference:v2.3
          resources:
            limits:
              nvidia.com/gpu: 1
              memory: "16Gi"
            requests:
              nvidia.com/gpu: 1
              memory: "12Gi"
# 노드에 GPU 레이블 추가 (EKS에서 GPU 노드 그룹 생성 시 자동 추가됨)
kubectl label node gpu-node-1 accelerator=nvidia-gpu

# 배포 및 배치 확인
kubectl apply -f ml-inference.yaml
kubectl get pods -l app=ml-inference -o wide
# NAME              NODE          STATUS
# ml-inference-aaa  gpu-node-1   Running
# ml-inference-bbb  gpu-node-2   Running
Taint와 Toleration: 노드를 특정 파드만 받도록
GPU 노드에 Node Affinity만 설정하면 GPU 파드가 올바른 노드에 배치됩니다. 그런데 일반 nginx 파드도 GPU 노드를 선택할 수 있어 비용이 비싼 GPU 자원이 낭비됩니다. Affinity는 파드가 어떤 노드를 선호하는지를 표현하지만, 노드 입장에서 특정 파드 외에는 받지 않겠다고 선언하는 방법이 별도로 필요합니다. Taint는 노드에 "이 조건을 견딜 수 없는 파드는 들어오지 마라"는 표시를 하고, Toleration은 파드에 "나는 이 Taint를 견딜 수 있다"고 선언합니다. 이 CB에서는 GPU 노드를 Taint로 보호하고 GPU 파드에만 Toleration을 부여하는 패턴을 다룹니다.
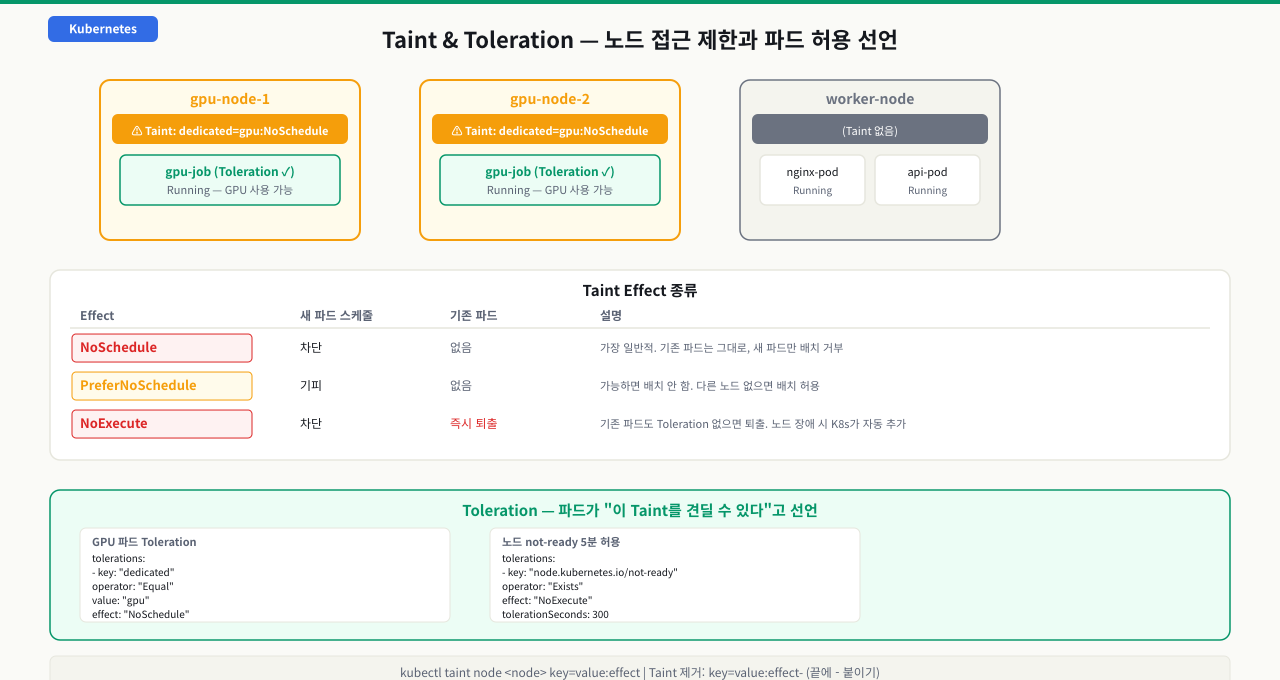 확대
확대
노드 스케줄링 제한
안전한 실행 조건: 노드 격리 목적과 해제 명령을 명확히 알고 있을 때만 실행하세요.
실행 전 반드시 확인
- 현재 컨텍스트와 Namespace가 의도한 대상인지 확인했는가
- 운영 트래픽이나 상태 저장 데이터에 미치는 영향을 확인했는가
- 되돌릴 매니페스트, 백업, 또는 복구 절차가 준비되어 있는가
kubectl taint node gpu-node-1 dedicated=gpu:NoSchedule위 항목을 모두 확인한 후 복사할 수 있습니다
# GPU 노드에 Taint 추가
kubectl taint node gpu-node-1 dedicated=gpu:NoSchedule
kubectl taint node gpu-node-2 dedicated=gpu:NoSchedule

# Taint 확인
kubectl describe node gpu-node-1 | grep -A 3 "Taints:"
# Taints:  dedicated=gpu:NoSchedule

# 일반 파드 배포 시도 (Toleration 없음)
kubectl run ordinary-pod --image=nginx
kubectl get pod ordinary-pod -o wide
# NAME          NODE    STATUS
# ordinary-pod  <none>  Pending   ← gpu-node에 배치 불가, 다른 노드에 배치됨
# GPU 파드 — Taint를 Tolerate하는 파드
apiVersion: v1
kind: Pod
metadata:
  name: gpu-job
spec:
  tolerations:
    # Taint key=dedicated, value=gpu, effect=NoSchedule을 허용
    - key: "dedicated"
      operator: "Equal"
      value: "gpu"
      effect: "NoSchedule"
  affinity:
    nodeAffinity:
      # Toleration으로 들어갈 수는 있지만, 반드시 GPU 노드로 가도록 Affinity도 설정
      requiredDuringSchedulingIgnoredDuringExecution:
        nodeSelectorTerms:
          - matchExpressions:
              - key: dedicated
                operator: In
                values:
                  - gpu
  containers:
    - name: cuda-workload
      image: nvidia/cuda:12.0-base
      resources:
        limits:
          nvidia.com/gpu: 1
kubectl apply -f gpu-job.yaml
kubectl get pod gpu-job -o wide
# NAME      NODE          STATUS
# gpu-job   gpu-node-1   Running   ← GPU 노드에 정상 배치
NoSchedule vs PreferNoSchedule vs NoExecute
노드 유지보수를 위해 Taint를 추가했는데 이미 실행 중인 파드가 그대로 남아 있습니다. 반대로 노드에 디스크 압박이 생겨 NoExecute Taint가 자동으로 추가됐더니 실행 중이던 파드가 모두 퇴출됐습니다. Taint effect 선택에 따라 기존 파드에 미치는 영향이 전혀 다릅니다. NoSchedule은 새 파드만 막고 기존 파드는 유지하며, NoExecute는 기존 파드도 퇴출시킵니다. 유지보수 상황과 긴급 격리 상황에서 어떤 effect를 써야 하는지 이해하면 의도치 않은 서비스 중단을 막을 수 있습니다. 이 CB에서는 세 가지 Taint effect의 차이와 실무 사용 상황을 다룹니다.
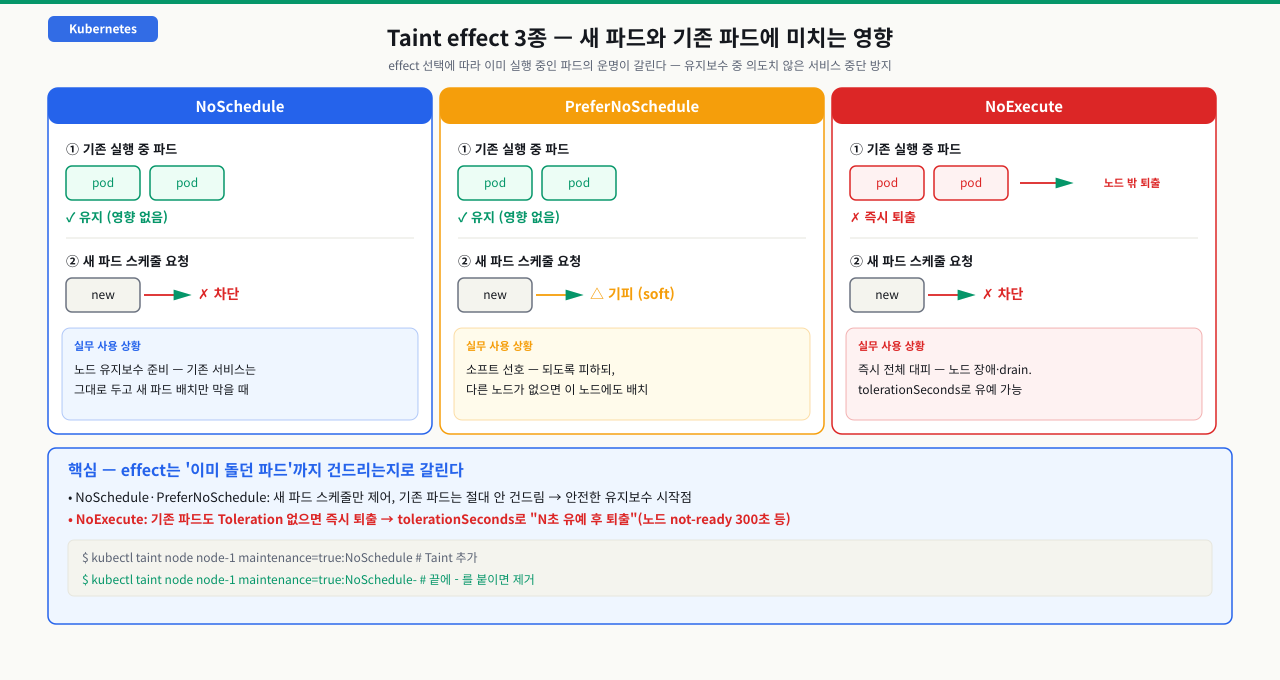 확대
확대
노드 스케줄링 제한
안전한 실행 조건: 노드 격리 목적과 해제 명령을 명확히 알고 있을 때만 실행하세요.
실행 전 반드시 확인
- 현재 컨텍스트와 Namespace가 의도한 대상인지 확인했는가
- 운영 트래픽이나 상태 저장 데이터에 미치는 영향을 확인했는가
- 되돌릴 매니페스트, 백업, 또는 복구 절차가 준비되어 있는가
kubectl taint node node-1 maintenance=true:NoSchedule위 항목을 모두 확인한 후 복사할 수 있습니다
# NoSchedule: 새 파드 스케줄 차단 (기존 파드 영향 없음)
kubectl taint node node-1 maintenance=true:NoSchedule

# PreferNoSchedule: 가능하면 배치 안 함 (다른 노드 없으면 배치)
kubectl taint node node-1 disk-pressure=high:PreferNoSchedule

# NoExecute: 새 파드 차단 + 기존 파드도 Toleration 없으면 퇴출
kubectl taint node node-1 maintenance=true:NoExecute

# Taint 제거
kubectl taint node node-1 maintenance=true:NoSchedule-   # 끝에 - 붙이면 제거
# NoExecute Taint를 일정 시간 허용하는 Toleration
spec:
  tolerations:
    - key: "node.kubernetes.io/not-ready"
      operator: "Exists"
      effect: "NoExecute"
      tolerationSeconds: 300   # 노드 not-ready 상태를 5분간 허용 후 퇴출
| Effect | 새 파드 스케줄 | 기존 파드 퇴출 |
|---|---|---|
| NoSchedule | 차단 | 없음 |
| PreferNoSchedule | 기피 | 없음 |
| NoExecute | 차단 | 즉시 퇴출 (tolerationSeconds 설정 가능) |
실습: 전용 노드 설정 패턴
고메모리 노드 그룹을 배치 작업 전용으로 설정하고, 일반 파드가 들어오지 못하도록 합니다.
노드 스케줄링 제한
안전한 실행 조건: 노드 격리 목적과 해제 명령을 명확히 알고 있을 때만 실행하세요.
실행 전 반드시 확인
- 현재 컨텍스트와 Namespace가 의도한 대상인지 확인했는가
- 운영 트래픽이나 상태 저장 데이터에 미치는 영향을 확인했는가
- 되돌릴 매니페스트, 백업, 또는 복구 절차가 준비되어 있는가
kubectl taint node high-mem-node-1 dedicated=batch:NoSchedule위 항목을 모두 확인한 후 복사할 수 있습니다
# 1. 고메모리 노드에 레이블과 Taint 추가
kubectl label node high-mem-node-1 node-type=high-memory workload=batch
kubectl label node high-mem-node-2 node-type=high-memory workload=batch
kubectl taint node high-mem-node-1 dedicated=batch:NoSchedule
kubectl taint node high-mem-node-2 dedicated=batch:NoSchedule

# 2. 일반 파드 → 고메모리 노드에 배치 불가 확인
kubectl run normal-api --image=nginx --replicas=3
kubectl get pods -l run=normal-api -o wide
# 모두 일반 노드에 배치됨 (Taint가 막아줌)
# batch-job.yaml — 배치 작업 전용 Job
apiVersion: batch/v1
kind: Job
metadata:
  name: data-processing-job
spec:
  template:
    spec:
      tolerations:
        - key: "dedicated"
          operator: "Equal"
          value: "batch"
          effect: "NoSchedule"
      affinity:
        nodeAffinity:
          requiredDuringSchedulingIgnoredDuringExecution:
            nodeSelectorTerms:
              - matchExpressions:
                  - key: node-type
                    operator: In
                    values:
                      - high-memory
      containers:
        - name: data-processor
          image: myrepo/data-processor:v1.5
          resources:
            requests:
              memory: "32Gi"
              cpu: "4"
            limits:
              memory: "48Gi"
              cpu: "8"
      restartPolicy: Never
kubectl apply -f batch-job.yaml
kubectl get pod -l job-name=data-processing-job -o wide
# NAME                    NODE              STATUS
# data-processing-job-xxx high-mem-node-1  Running  ← 전용 노드에 배치
ML 추론 서버가 GPU 노드가 아닌 일반 CPU 노드에 배치되어 추론 속도가 100배 느려지는 상황이 발생했습니다. 로그를 보면 분명 실행 중인데 GPU를 인식하지 못합니다.
# 증상: 파드가 GPU 노드가 아닌 일반 노드에 배치됨
kubectl get pod ml-inference-xxx -o wide
# NAME              NODE      STATUS   NODE
# ml-inference-xxx  node-5   Running   ← GPU 노드(gpu-node-1,2)가 아닌 일반 노드!

# 원인 조사: Affinity 설정 확인
kubectl get pod ml-inference-xxx -o yaml | grep -A 20 affinity
# nodeAffinity:
#   requiredDuringSchedulingIgnoredDuringExecution:
#     nodeSelectorTerms:
#       - matchExpressions:
#           - key: acceleretor    ← 오타! accelerator가 아닌 acceleretor
#             operator: In
#             values:
#               - nvidia-gpu

# 노드 레이블 확인
kubectl get nodes --show-labels | grep accelerator
# gpu-node-1   accelerator=nvidia-gpu   ← 노드에는 accelerator (올바른 스펠링)
# 스케줄러 결정 과정 확인
kubectl describe pod ml-inference-xxx | grep -A 10 "Events:"
# Events:
#   Warning  FailedScheduling  ...  0/5 nodes are available:
#     5 node(s) didn't match Pod's node affinity/selector.
# ← required 조건이 실패해야 하는데, 어딘가에 파드가 배치됨

# 이 경우: required 조건의 key 오타로 인해
# 조건 자체가 무효가 되어 스케줄러가 무시한 것
# 오타가 있는 key는 어떤 노드에도 해당 레이블이 없으므로
# In 연산자로 매칭되는 노드가 0개 → preferred 조건으로 fallback 동작
# 수정: Deployment의 Affinity 설정 수정
kubectl edit deployment ml-inference
# acceleretor → accelerator 로 수정

# 수정 후 파드 재배치 확인
kubectl rollout restart deployment ml-inference
kubectl get pods -l app=ml-inference -o wide
# NAME              NODE          STATUS
# ml-inference-aaa  gpu-node-1   Running  ← 올바른 노드로 재배치
# ml-inference-bbb  gpu-node-2   Running

# 예방: 배포 전 dry-run으로 affinity 매칭 노드 확인
kubectl get nodes -o json | jq '.items[] | select(.metadata.labels.accelerator != null) | .metadata.name'
# "gpu-node-1"
# "gpu-node-2"
# ← 이 노드들이 파드를 받아야 함
근본 원인: required 조건에 오타가 있는 레이블 키를 사용하면, 해당 레이블이 어떤 노드에도 없으므로 조건이 "의도와 다르게 통과"되는 경우가 있습니다. Taint+Affinity를 함께 사용하면 오타가 있더라도 Taint가 1차 방어선 역할을 합니다. 또한 kubectl auth can-i 처럼 파드와 노드 간 affinity 매칭을 dry-run으로 검증하는 절차를 CI/CD에 추가하는 것이 좋습니다.
심화 — 스케줄러는 노드를 어떻게 고르는가
심화: 스케줄러의 두 단계 — Filter(필수)와 Score(선호), 그리고 preferred가 무시되는 이유
파드가 "왜 저 노드에 갔지?"를 이해하려면 스케줄러가 노드를 고르는 두 단계를 알아야 합니다. required와 preferred가 서로 다른 단계에서 작동한다는 점을 놓치면, 선호 조건이 무시되는 정상 동작을 버그로 오해하게 됩니다.
- 1단계 Filter(Predicate): 스케줄러는 먼저 하드 조건으로 후보 노드를 걸러냅니다. required nodeAffinity, nodeSelector, taint/toleration, 리소스 요청(requests) 수용 가능 여부, PV 토폴로지 등이 여기 속합니다. 하나라도 못 넘기면 그 노드는 후보에서 탈락하고, 후보가 0개면 파드는 Pending에 머뭅니다.
- 2단계 Score(Priority): Filter를 통과한 후보 노드마다 점수를 매겨 최고점 노드를 고릅니다. 이 점수는 여러 scoring 플러그인의 합입니다 — NodeResourcesFit/BalancedAllocation(리소스 균형), ImageLocality(이미지가 이미 있는 노드 선호), InterPodAffinity, PodTopologySpread(토폴로지 분산), TaintToleration 등.
- preferred는 Score 단계의 한 표일 뿐이다: preferredDuringScheduling의 weight는 "이 조건을 만족하는 노드 점수에 weight를 더해라"입니다. 그런데 그것은 최종 합의 일부일 뿐이라, weight 100을 줘도 다른 노드가 리소스 균형·이미지 로컬리티에서 더 높은 총점을 받으면 그쪽으로 갑니다. 선호는 보장이 아니라 가중치입니다. 반드시 특정 노드여야 하면 required(하드)나 taint로 표현해야 합니다.
- 판정은 스케줄 순간의 스냅샷이다: 두 단계 모두 IgnoredDuringExecution이라, 이미 뜬 파드는 나중에 노드 레이블·혼잡도가 바뀌어도 그대로 남습니다. 실행 중 재균형은 스케줄러가 아니라 descheduler 같은 별도 도구의 영역입니다.
상황: 지연을 줄이려고 앱을 topology.kubernetes.io/zone=ap-northeast-2a에 preferred weight 100으로 몰고 싶은데, 새로 뜨는 파드의 절반이 2c로 배치됩니다. required로 바꾸자니 그 zone 노드가 부족할 때 Pending 위험이 있어 망설여집니다.
원인: preferred affinity는 Filter가 아니라 Score 단계의 가중치입니다. 2a 노드들이 이미 붐벼 있어 스케줄러의 다른 scoring 플러그인(리소스 균형, PodTopologySpread 기본 제약)이 2c 노드에 더 높은 점수를 줬고, preferred의 weight 100을 더해도 총점에서 2c가 앞선 것입니다. "자꾸 다른 zone으로 간다"는 것은 버그가 아니라 스케줄러가 점수를 합산한 정상 결과입니다.
진단: Events에는 스케줄 성공만 찍히고 이유는 안 나옵니다. 노드별 점수를 봐야 합니다.
# 스케줄러 로그 레벨을 올려 노드별 플러그인 점수 확인
kubectl -n kube-system logs kube-scheduler-<node> | grep -i "score"

# 선호 zone 노드가 이미 붐비는지 확인
kubectl top nodes
kubectl get pods -A -o wide --field-selector spec.nodeName=<2a-node>
2a 노드가 리소스·파드 수에서 이미 포화라면, 리소스 균형 점수가 2c를 밀어 올린 것으로 확정입니다.
해결: 목적에 맞게 표현 방식을 바꿉니다. (1) 정말로 그 zone이어야 하면 required로 승격하되, 먼저 그 zone에 충분한 용량(노드·오토스케일)을 확보합니다. (2) 오히려 zone 간 고른 분산이 목적이면 topologySpreadConstraints로 명시적으로 제어합니다. (3) 선호는 유지하되 "선호는 SLA가 아니다"를 받아들이고, 하드 요구는 required·taint로 옮깁니다. preferred 하나에 가용성·지연 보장을 걸지 않는 것이 핵심입니다.
시나리오: EKS에서 스팟 인스턴스와 온디맨드 인스턴스 혼합 사용
비용 절감을 위해 EKS에 스팟 인스턴스 노드 그룹을 추가했습니다. 상태 비저장 배치 작업은 스팟에, 프로덕션 API는 온디맨드에 배치해야 합니다.
# 노드 그룹 레이블 확인 (EKS 관리형 노드 그룹이 자동으로 붙임)
kubectl get nodes --show-labels | grep lifecycle
# node-1  lifecycle=Ec2Spot
# node-2  lifecycle=Ec2Spot
# node-3  lifecycle=OnDemand
# node-4  lifecycle=OnDemand
# 프로덕션 API — 온디맨드 필수 + 스팟은 절대 안됨
apiVersion: apps/v1
kind: Deployment
metadata:
  name: payment-api
spec:
  template:
    spec:
      affinity:
        nodeAffinity:
          requiredDuringSchedulingIgnoredDuringExecution:
            nodeSelectorTerms:
              - matchExpressions:
                  - key: lifecycle
                    operator: In
                    values:
                      - OnDemand
---
# 배치 작업 — 스팟 선호, 온디맨드도 허용
apiVersion: batch/v1
kind: Job
metadata:
  name: etl-job
spec:
  template:
    spec:
      affinity:
        nodeAffinity:
          preferredDuringSchedulingIgnoredDuringExecution:
            - weight: 100
              preference:
                matchExpressions:
                  - key: lifecycle
                    operator: In
                    values:
                      - Ec2Spot
      # 스팟 인스턴스 회수(interruption) 시 빠르게 종료되도록
      terminationGracePeriodSeconds: 30
      containers:
        - name: etl
          image: myrepo/etl-job:v3
실무 포인트: EKS Karpenter를 사용하면 Node Affinity와 Taint를 기반으로 노드를 동적으로 프로비저닝합니다. nodeSelector: karpenter.sh/capacity-type: spot처럼 단순 레이블로도 스팟/온디맨드를 제어할 수 있어 Affinity 설정이 더 직관적이 됩니다.
핵심 요약
| 개념 | 명령/설정 | 실무 사용 빈도 |
|---|---|---|
| 노드 레이블 추가 | kubectl label node <node> key=value | 노드 그룹 설정 시 |
| Taint 추가 | kubectl taint node <node> key=value:effect | 전용 노드 격리 시 |
| Taint 제거 | kubectl taint node <node> key=value:effect- | 격리 해제 시 |
| required Affinity | requiredDuringSchedulingIgnoredDuringExecution | 반드시 특정 노드에 |
| preferred Affinity | preferredDuringSchedulingIgnoredDuringExecution | 선호 노드 지정 |
| Toleration 설정 | spec.tolerations[].key/effect | 전용 노드 파드에 |
| Pending 원인 확인 | kubectl describe pod <pod> Events 섹션 | 스케줄 실패 디버깅 |
| 노드 레이블 확인 | kubectl get nodes --show-labels | Affinity 작성 전 |
노드 레이블 확인 및 추가
kubectl get nodes --show-labels
kubectl label node $(kubectl get nodes -o jsonpath='{.items[0].name}') disk=ssd예상 출력
node/minikube labeled
NodeSelector로 특정 레이블 노드에 파드 배치
kubectl apply -f - <<'EOF'
apiVersion: v1
kind: Pod
metadata:
name: ssd-workload
spec:
nodeSelector:
  disk: ssd
containers:
- name: app
  image: nginx:alpine
  resources:
    requests:
      cpu: "10m"
      memory: "16Mi"
    limits:
      cpu: "100m"
      memory: "64Mi"
EOF
kubectl get pod ssd-workload -o wide예상 출력
NAME           READY   STATUS    NODE
ssd-workload   1/1     Running   minikube
Node Affinity(required) 파드 배포 확인
kubectl apply -f - <<'EOF'
apiVersion: v1
kind: Pod
metadata:
name: affinity-pod
spec:
affinity:
  nodeAffinity:
    requiredDuringSchedulingIgnoredDuringExecution:
      nodeSelectorTerms:
      - matchExpressions:
        - key: disk
          operator: In
          values:
          - ssd
containers:
- name: app
  image: nginx:alpine
  resources:
    requests:
      cpu: "10m"
      memory: "16Mi"
    limits:
      cpu: "100m"
      memory: "64Mi"
EOF
kubectl get pod affinity-pod -o wide예상 출력
NAME           READY   STATUS    NODE
affinity-pod   1/1     Running   minikube
노드 Taint 설정 및 확인
kubectl taint node $(kubectl get nodes -o jsonpath='{.items[0].name}') dedicated=test:NoSchedule
kubectl describe node $(kubectl get nodes -o jsonpath='{.items[0].name}') | grep Taints예상 출력
Taints: dedicated=test:NoSchedule
실습 리소스 및 Taint 정리
kubectl delete pod ssd-workload affinity-pod
kubectl taint node $(kubectl get nodes -o jsonpath='{.items[0].name}') dedicated=test:NoSchedule-
kubectl label node $(kubectl get nodes -o jsonpath='{.items[0].name}') disk-예상 출력
pod "ssd-workload" deleted
pod "affinity-pod" deleted
node/minikube untainted
node/minikube unlabeled
명령어·단축키 빠른 참조
이 모듈에서 다룬 노드 레이블·Taint·스케줄링 진단 명령을 실전 옵션과 함께 모았습니다. required는 Filter(불충족 시 Pending), preferred는 Score(가중치) 단계임을 기억하세요.
| 명령어/단축키 | 용도 | 자주 쓰는 예 |
|---|---|---|
kubectl get nodes --show-labels | affinity 작성 전 노드 레이블 확인 | kubectl get nodes --show-labels | grep accelerator |
kubectl label node | 노드 레이블 추가·제거 | kubectl label node gpu-1 accelerator=nvidia-gpu(제거는 disk-) |
kubectl taint node | 전용 노드 격리(Taint 추가) | kubectl taint node gpu-1 dedicated=gpu:NoSchedule |
kubectl taint node ...- | Taint 제거(끝에 -) | kubectl taint node node-1 maintenance=true:NoSchedule- |
kubectl describe node | grep Taints | 노드의 Taint 확인 | kubectl describe node gpu-1 | grep -A3 Taints |
kubectl get pod -o wide | 파드가 배치된 NODE 확인 | kubectl get pods -l app=ml-inference -o wide |
kubectl describe pod (Events) | Pending 원인(FailedScheduling) 확인 | kubectl describe pod <pod> | grep -A10 Events |
kubectl get pod -o yaml | grep affinity | affinity 키 오타 진단 | kubectl get pod <pod> -o yaml | grep -A20 affinity |
kubectl get nodes -o json | jq | affinity 매칭 노드 사전 검증 | jq '.items[] | select(.metadata.labels.accelerator!=null) | .metadata.name' |
kubectl rollout restart | 수정 후 파드 재배치 | kubectl rollout restart deployment ml-inference |
kubectl top nodes | 선호 zone 혼잡도(Score 밀림) 확인 | kubectl top nodes |
| kube-scheduler 로그 | preferred 무시 시 노드별 점수 확인 | kubectl -n kube-system logs kube-scheduler-<node> | grep -i score |
관련 모듈로 더 깊이:
- requests와 limits 적정 값 계산과 CPU 스로틀링 대처 — 노드 배치가 결정된 뒤 그 노드에서 쓸 수 있는 CPU·메모리 양을 제어하는 법
- DaemonSet과 상태 저장형 앱 배포를 위한 StatefulSet 완벽 분석 — 모든 노드 또는 특정 노드에만 파드를 띄우는 워크로드와 어피니티의 조합
- PDB(PodDisruptionBudget) 설정으로 가용성 지키며 드레인하기 — 노드 드레인·재배치 시 최소 가용 파드 수를 보장하는 안전장치
다음 모듈 resource-limits에서는 파드가 어느 노드에 배치되든 CPU와 메모리를 얼마나 사용할 수 있는지 제어하는 방법을 다룹니다. requests와 limits의 차이, QoS 클래스(Guaranteed/Burstable/BestEffort), OOMKilled 방지 전략을 실습합니다.