전사 SSO 도입 프로젝트에 투입됐습니다. AD FS를 IdP로 쓰고 우리 서비스가 SP 역할을 해야 합니다. SAML 설정을 잡았는데 로그인 후 계속 루프가 돌고, 분명 인증은 됐는데 앱에 로그인이 안 됩니다. 로그에는 아무 에러도 없습니다. 한편 모바일 앱 팀은 OAuth 2.0으로 소셜 로그인을 구현하는데 authorization code와 access_token이 왜 다른 단계에서 전달되는지 이해가 안 된다고 합니다.
이 모듈에서는 SAML 2.0 SP-initiated 흐름, SAML Response 분석 방법, OAuth 2.0 Authorization Code Flow, 그리고 SSO 장애의 대표 패턴을 다룹니다.
- 1IdP/SP 역할과 SAML 2.0 SP-initiated 흐름 전체를 단계별로 설명할 수 있다
- 2SAML Response를 base64 디코딩해 NameID, Attribute, 서명 정보를 분석할 수 있다
- 3OAuth 2.0 Authorization Code Flow와 토큰 교환 과정을 설명할 수 있다
- 4SSO redirect loop의 원인과 SameSite 쿠키 설정으로 해결할 수 있다
- 5No InResponseTo 오류가 IdP-initiated 흐름에서 발생하는 이유를 설명할 수 있다
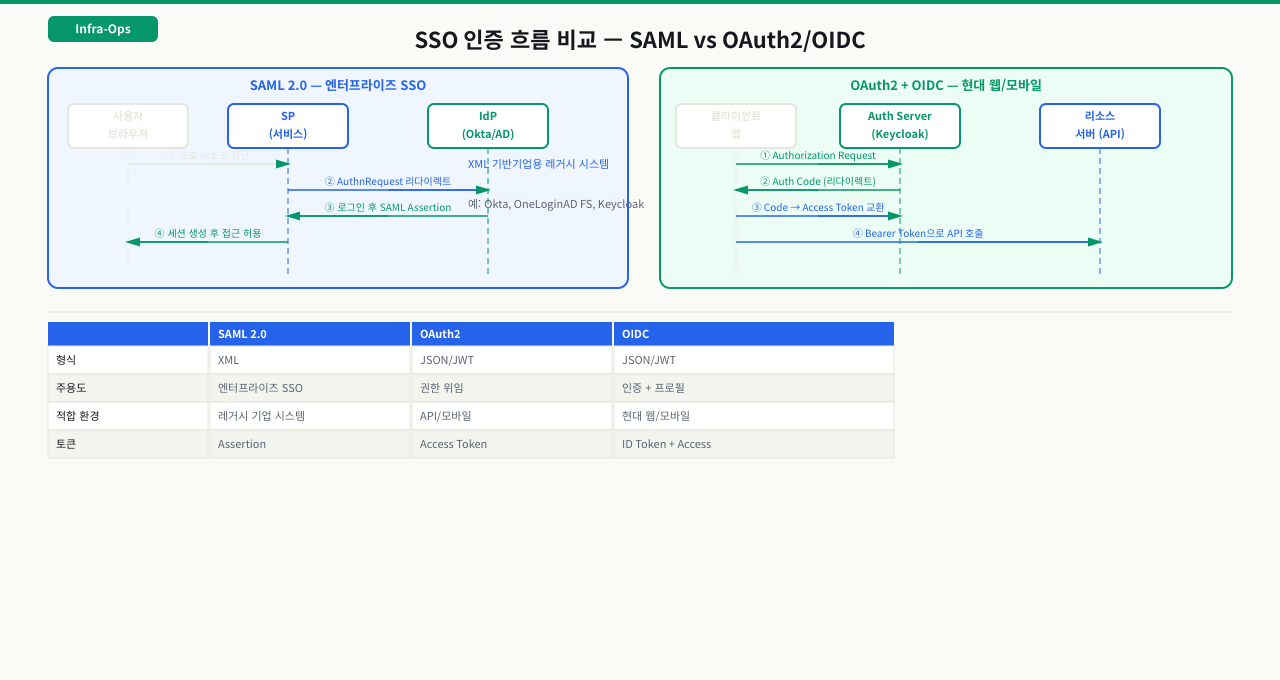
SAML 2.0 — 엔터프라이즈 SSO의 표준
IdP/SP 구조와 SP-initiated 흐름
SAML(Security Assertion Markup Language)은 엔터프라이즈 SSO에서 가장 많이 쓰이는 표준입니다. 금융, 공공기관, 대기업의 내부 시스템 연동에 자주 사용됩니다. 처음 보면 용어가 낯설지만, 핵심은 "IdP가 인증하고, 그 결과를 서명된 XML로 SP에 전달한다"는 흐름입니다.
 확대
확대
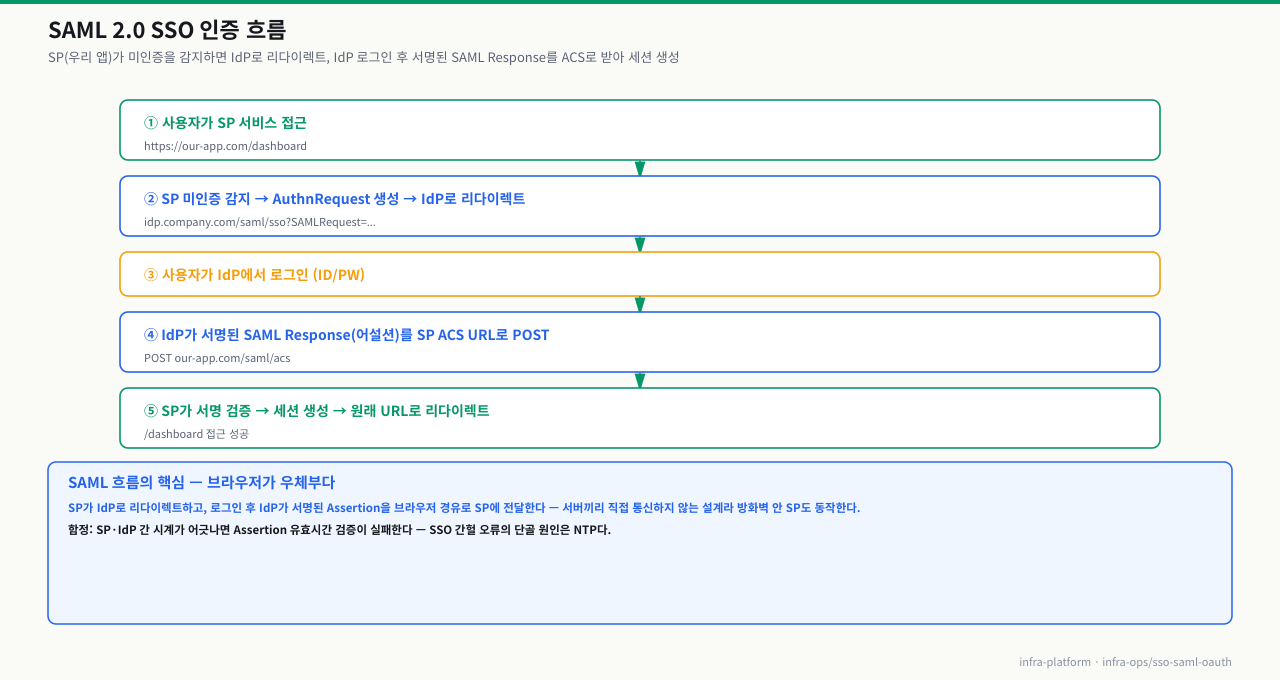
전사 SSO 도입 직후, 정상적으로 로그인됐다는 IdP 로그가 찍히는데 우리 앱에는 세션이 생기지 않아 무한 리다이렉트가 반복되는 장애가 납니다. 개발팀도, 보안팀도, AD 담당자도 각자 "우리 쪽 문제 아니다"라고 합니다. 원인을 찾으려면 IdP와 SP가 어떻게 신뢰를 주고받는지부터 이해해야 합니다. SAML은 XML 기반 어설션으로 인증 결과를 전달하는 표준이고, SP는 그 어설션을 검증해 세션을 만듭니다. IdP(Identity Provider)는 사용자를 인증하는 서버이고, SP(Service Provider)는 그 결과를 받아 서비스를 제공하는 우리 앱입니다.
SP-initiated SAML 흐름 (가장 일반적인 방식):
 확대
확대
SAML 설정 시 SP가 IdP에 제공해야 할 정보:
| 항목 | 예시 | 설명 |
|---|---|---|
| Entity ID | https://our-app.com/saml/metadata | SP의 고유 식별자 (URI 형식) |
| ACS URL | https://our-app.com/saml/acs | SAML Response를 받을 엔드포인트 |
| SLO URL | https://our-app.com/saml/slo | 싱글 로그아웃 엔드포인트 |
| SP 인증서 | X.509 공개키 | IdP가 SP로 보내는 어설션 암호화용 |
IdP가 SP에 제공하는 정보:
| 항목 | 설명 |
|---|---|
| IdP Entity ID | IdP 고유 식별자 |
| SSO URL | SP가 AuthnRequest를 보낼 IdP 로그인 URL |
| IdP 인증서 | SP가 SAML Response 서명 검증에 사용 |
| 메타데이터 XML | 위 정보 전체를 담은 파일 |
SAML 핵심 설정 — Spring Security SAML 예시
SAML 연동에서 인증이 안 된다는 장애의 절반 이상은 SP 설정의 Entity ID나 ACS URL이 IdP에 등록된 값과 조금이라도 다른 것이 원인입니다. IdP는 어설션을 보낼 대상을 이 두 값으로 엄격하게 검증하기 때문에, 공백 한 칸이나 마지막 슬래시 하나 차이도 전체 인증 실패로 이어집니다. 특히 Nginx 리버스 프록시 앞단이 있는 환경에서는 X-Forwarded-Proto 헤더가 없으면 ACS URL이 https:// 대신 http://로 생성돼 불일치가 발생하는 패턴이 매우 흔합니다.
# application.yml (Spring Boot + Spring Security SAML)
spring:
  security:
    saml2:
      relyingparty:
        registration:
          adfs:
            entity-id: https://our-app.com/saml/metadata   # SP Entity ID
            asserting-party:
              metadata-uri: https://idp.company.com/FederationMetadata/2007-06/FederationMetadata.xml
            acs:
              location: "{baseUrl}/saml/acs"                # ACS URL
            signing:
              credentials:
                - private-key-location: classpath:saml/sp-private.key
                  certificate-location: classpath:saml/sp-cert.crt
Nginx에서 SAML ACS 경로 프록시 설정:
# SP 앞에 Nginx가 있는 경우 ACS URL이 정확히 프록시 되어야 함
location /saml/ {
    proxy_pass http://backend:8080;
    proxy_set_header Host $host;
    proxy_set_header X-Forwarded-For $proxy_add_x_forwarded_for;
    proxy_set_header X-Forwarded-Proto $scheme;
    # X-Forwarded-Proto를 SP가 읽어 ACS URL에 https를 붙여야 함
    # 미설정 시 ACS URL이 http://로 생성되어 IdP와 불일치
}
 확대
확대
SAML Response 분석
base64 디코딩으로 SAML Response 내용 확인하기
SAML Response는 base64로 인코딩된 XML입니다. 로그인 문제를 디버깅할 때 브라우저 개발자 도구의 Network 탭에서 ACS URL로의 POST 요청을 찾아 SAMLResponse 값을 디코딩하면 실제 어설션 내용을 볼 수 있습니다.
SAML Response 분석 명령어:
# 브라우저 Network 탭에서 ACS POST 요청의 SAMLResponse 값을 복사 후 분석
# URL 인코딩된 경우 먼저 디코딩 필요

SAML_RESPONSE="BASE64_ENCODED_SAML_RESPONSE_HERE"

# base64 디코딩 후 XML 포맷팅
echo "$SAML_RESPONSE" | base64 -d | xmllint --format - 2>/dev/null | head -80

# NameID (사용자 식별자) 확인
echo "$SAML_RESPONSE" | base64 -d | xmllint --format - 2>/dev/null \
  | grep -E "NameID|NameIdentifier"
# 출력 예: <saml:NameID Format="urn:oasis:names:tc:SAML:1.1:nameid-format:emailAddress">
#            user@company.com
#          </saml:NameID>

# Attribute (역할, 부서 등 추가 정보) 확인
echo "$SAML_RESPONSE" | base64 -d | xmllint --format - 2>/dev/null \
  | grep -A 3 "Attribute"
# 출력 예: <saml:Attribute Name="role">
#            <saml:AttributeValue>admin</saml:AttributeValue>
#          </saml:Attribute>

# InResponseTo 확인 (SP-initiated는 있어야 함)
echo "$SAML_RESPONSE" | base64 -d | xmllint --format - 2>/dev/null \
  | grep "InResponseTo"

# 어설션 유효 시간 확인 (서버 시간 차이 문제 진단)
echo "$SAML_RESPONSE" | base64 -d | xmllint --format - 2>/dev/null \
  | grep -E "NotBefore|NotOnOrAfter"
# NotBefore와 NotOnOrAfter 사이여야 유효
# 서버 시간이 5분 이상 차이나면 어설션이 expired로 거부됨
서버 시간 동기화 확인:
# NTP 동기화 상태 확인
timedatectl status
# "System clock synchronized: yes"가 있어야 함

# IdP와 SP 서버 시간 차이 허용 범위: 보통 ±5분
# 차이가 크면 "Assertion not yet valid" 또는 "Assertion expired" 에러
date -u     # SP 서버 UTC 시간
OAuth 2.0 — API 연동과 소셜 로그인
Authorization Code Flow — 왜 두 단계인가
OAuth 2.0은 SAML보다 가볍고 REST API 친화적인 인가 프레임워크입니다. 소셜 로그인(Google, Kakao, Naver), 모바일 앱 인증, API 연동에 광범위하게 사용됩니다.
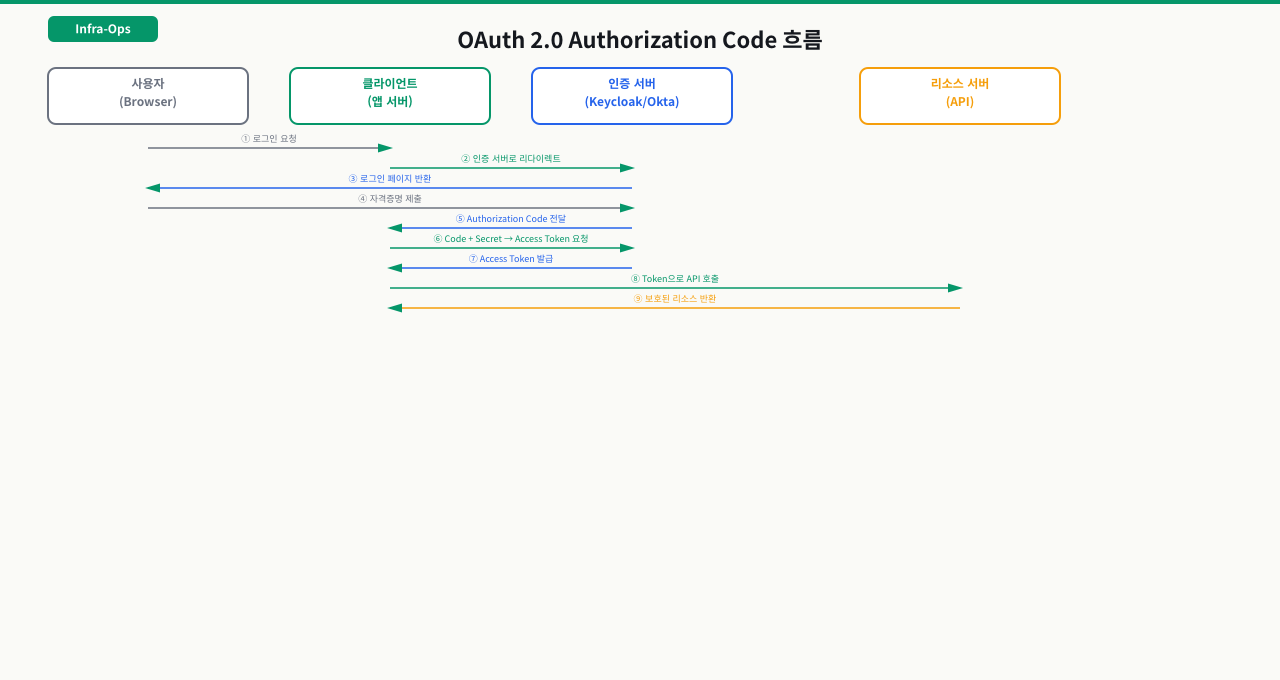
Authorization Code Flow 전체 흐름:
 확대
확대
token 교환 curl 예시:
# 5단계: authorization code → access_token 교환
curl -X POST https://auth.example.com/oauth/token \
  -H "Content-Type: application/x-www-form-urlencoded" \
  -d "grant_type=authorization_code" \
  -d "code=AUTH_CODE_FROM_STEP4" \
  -d "client_id=my-client-id" \
  -d "client_secret=my-client-secret" \
  -d "redirect_uri=https://our-app.com/oauth/callback"

# 응답 예시:
# {
#   "access_token": "eyJhbGciOiJ...",
#   "token_type": "Bearer",
#   "expires_in": 3600,
#   "refresh_token": "1//0eGxH...",
#   "scope": "openid email profile"
# }

# access_token으로 사용자 정보 조회
curl https://www.googleapis.com/userinfo/v2/me \
  -H "Authorization: Bearer ACCESS_TOKEN"

# refresh_token으로 access_token 갱신 (만료 후)
curl -X POST https://auth.example.com/oauth/token \
  -d "grant_type=refresh_token" \
  -d "refresh_token=REFRESH_TOKEN" \
  -d "client_id=my-client-id" \
  -d "client_secret=my-client-secret"
access_token vs refresh_token:
| 항목 | access_token | refresh_token |
|---|---|---|
| 유효 기간 | 짧음 (1시간~수일) | 김 (30일~무기한) |
| 용도 | API 호출 시 Bearer 토큰 | access_token 갱신 |
| 저장 위치 | 메모리 또는 HTTP-only 쿠키 | 안전한 서버 저장소 |
| 노출 시 위험 | API 권한 탈취 | 장기 권한 탈취 |
로그인 한 번으로 인증되는 법 — OAuth/OIDC 토큰 교환 6단계
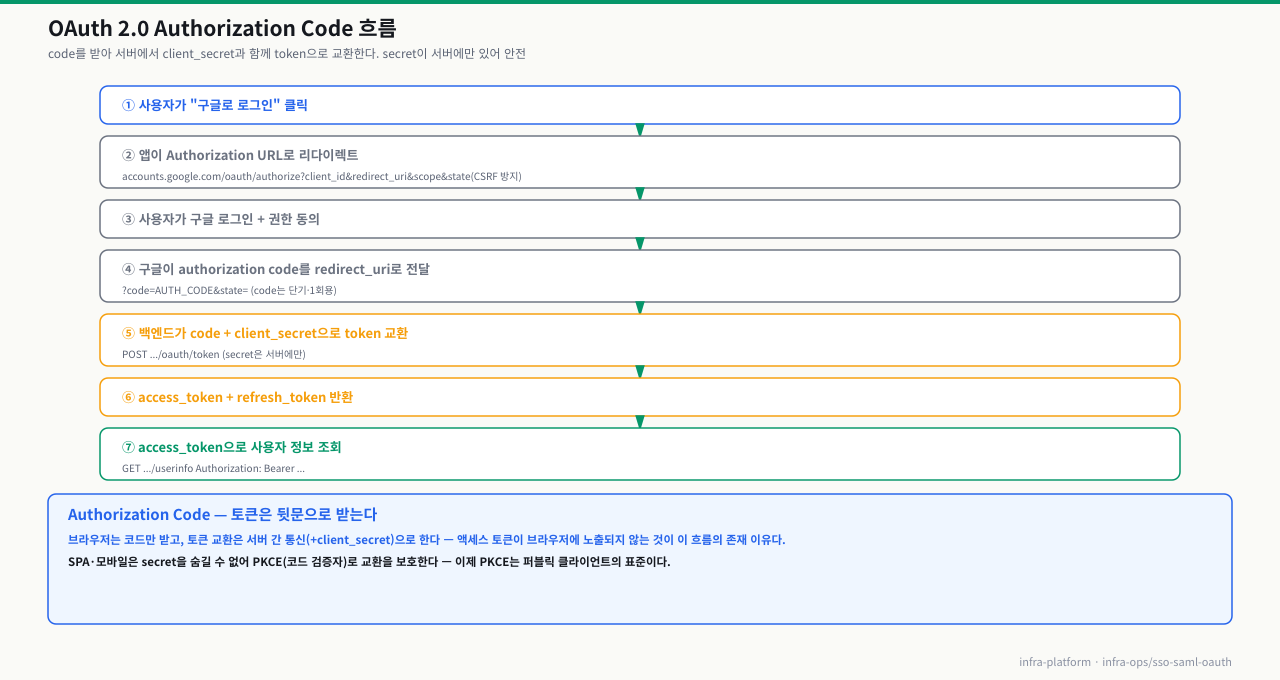
'구글로 로그인' 클릭 한 번이 도는 6단계 — code에서 token까지
"OAuth로 로그인"은 버튼 한 번이지만, 그 뒤에서 브라우저·앱 백엔드·IdP가 정해진 순서로 리다이렉트와 토큰 교환을 주고받습니다. 이 흐름을 단계로 쥐고 있어야 "왜 access token이 URL에 안 보이나", "code는 왜 한 번만 쓰이나", "invalid_grant는 어느 단계 문제인가"를 바로 짚을 수 있습니다. 핵심은 브라우저를 지나는 프런트채널로는 단기 code만 오가고, 실제 토큰은 서버끼리(백채널)만 교환한다는 것 — 이 분리가 OAuth Authorization Code 방식의 안전성 전부입니다.
[브라우저]  앱의 "구글로 로그인" 클릭
   │
   ① 앱 → IdP 인가 요청 리다이렉트  (프런트채널, authorization request)
   │     ?client_id=..&redirect_uri=..&scope=openid email
   │     &state=xyz(CSRF 방지) &code_challenge=..(PKCE)
   │
   ② IdP 화면에서 사용자 로그인 + 권한 동의(consent)
   │
   ③ IdP → 앱으로 리다이렉트  (프런트채널)
   │     redirect_uri?code=AUTH_CODE&state=xyz   ← 단기·1회용 code만 전달
   │     앱은 받은 state가 ①에서 보낸 값과 같은지 먼저 검증
   │
   ④ 앱 백엔드 → IdP 토큰 엔드포인트  (백채널, 서버↔서버)
   │     code + client_secret + code_verifier(PKCE) 제출
   │
   ⑤ IdP → 토큰 응답  (백채널)
   │     access_token(API 호출용) + id_token(OIDC 신원, JWT) + refresh_token
   │
   ⑥ 앱: id_token 서명 검증(IdP 공개키 = JWKS) → 로그인 세션 생성
   │     이후 access_token 을 Authorization: Bearer 로 리소스 API 호출
   ▼
[앱]  로그인 완료 · access 만료되면 refresh_token 으로 조용히 갱신
각 단계가 하는 일과, 여기서 막히면 나타나는 증상:
| 단계 | 하는 일 | 여기서 막히면 |
|---|---|---|
| ① 인가 요청 | 앱이 client_id·redirect_uri·scope·state·PKCE 챌린지를 붙여 IdP 로그인으로 보냄 | redirect_uri가 IdP 등록값과 한 글자라도 다르면 redirect_uri_mismatch로 로그인 화면 전에 거부 |
| ② 로그인·동의 | 사용자가 IdP에서 인증하고 요청된 scope 권한에 동의 | 동의 안 한 scope는 토큰에 안 담김 → 나중에 API에서 권한 부족 |
| ③ code 리다이렉트 | IdP가 단기·1회용 authorization code를 redirect_uri로 돌려보냄 | 돌아온 state가 ①의 값과 다르면 CSRF로 차단. code는 재사용·지연 시 무효 |
| ④ 토큰 교환(백채널) | 앱 백엔드가 code에 client_secret·PKCE code_verifier를 더해 토큰 요청 | invalid_grant — code 만료·재사용, redirect_uri 불일치, PKCE verifier 불일치가 대부분 |
| ⑤ 토큰 응답 | access(짧음)·id_token(신원)·refresh(김) 발급. 토큰은 백채널로만 오감 | 프런트로 토큰을 직접 받는 구형 implicit 방식은 URL·히스토리 노출 위험 — 그래서 code 방식을 씀 |
| ⑥ 검증·세션 | id_token(JWT) 서명을 IdP 공개키(JWKS)로 검증하고 만료·issuer·audience 확인 | JWKS 키가 회전됐는데 앱이 옛 키를 캐시하면 서명 검증 실패로 로그인 불가 |
즉 OAuth/OIDC 로그인은 프런트채널(브라우저)로는 신뢰할 수 없으니 code만 흘리고, 값진 토큰은 백채널(서버)에서만 교환하는 2단계 구조입니다. 같은 SSO라도 SAML은 IdP가 서명된 XML 어설션을 브라우저 POST로 SP의 ACS URL에 직접 실어 보내는 반면(위 SAML 절), OAuth/OIDC는 code→token 교환 + JWT 서명 검증으로 신원을 전달합니다. 그래서 장애를 좁힐 때는 "어느 채널·어느 단계에서 끊겼나"를 먼저 가릅니다 — 리다이렉트 파라미터(①③) 문제인지, 토큰 교환(④⑤) 문제인지, 검증(⑥) 문제인지. access token이 만료된 뒤 refresh로 갱신하는 과정의 함정은 아래 심화에서 다룹니다.
Keycloak 기초 — 오픈소스 IdP
Keycloak으로 로컬 IdP 구성하기
Keycloak은 Red Hat이 만든 오픈소스 IdP로, SAML과 OAuth/OIDC를 모두 지원합니다. 사내 SSO, 개발 환경 테스트용 IdP로 많이 사용됩니다.
Keycloak Docker 실행:
# 개발/테스트용 Keycloak 실행
docker run -p 8080:8080 \
  -e KEYCLOAK_ADMIN=admin \
  -e KEYCLOAK_ADMIN_PASSWORD=admin \
  quay.io/keycloak/keycloak:latest \
  start-dev

# http://localhost:8080/admin 접속 후 설정:
# 1. Realm 생성 (예: my-company)
# 2. Client 생성 → Client type: SAML 또는 OpenID Connect
# 3. Valid redirect URIs: https://our-app.com/*
# 4. 메타데이터 URL 확인: http://localhost:8080/realms/my-company/protocol/saml/descriptor
SAML 메타데이터 조회:
# IdP 메타데이터 XML 확인 (SP 설정에 필요한 IdP 정보 포함)
curl -s http://localhost:8080/realms/my-company/protocol/saml/descriptor \
  | xmllint --format - | grep -E "EntityID|SingleSignOn|X509Certificate"

# OIDC Well-known 설정 확인 (OAuth/OIDC 설정에 필요)
curl -s http://localhost:8080/realms/my-company/.well-known/openid-configuration \
  | python3 -m json.tool | grep -E "issuer|authorization_endpoint|token_endpoint"
실습 — SAML Response 분석과 OAuth Token 교환
브라우저 개발자 도구에서 복사한 SAMLResponse 값을 분석합니다.
# 브라우저 Network 탭 → ACS URL POST 요청 → Form Data → SAMLResponse 값 복사

SAML_RESPONSE="여기에_복사한_BASE64_값_붙여넣기"

# NameID와 Attribute 확인
echo "$SAML_RESPONSE" | base64 -d | xmllint --format - 2>/dev/null \
  | grep -E "NameID|Attribute|NotBefore|NotOnOrAfter|InResponseTo"

# 어설션 유효 시간 확인
echo "$SAML_RESPONSE" | base64 -d | xmllint --format - 2>/dev/null \
  | grep -E "NotBefore|NotOnOrAfter"
# 현재 서버 시간이 이 범위 안에 있어야 로그인 성공
date -u   # 현재 UTC 시간 확인
echo 'BASE64_STRING' | base64 -d | xmllint --format - | grep -E 'NameID|Attribute'- base64 디코딩 결과가 유효한 XML인지 먼저 확인 — "<?xml"으로 시작하면 정상. 깨진 문자열이면 URL 인코딩된 채로 디코딩한 것. %2B(+), %3D(=) 등을 먼저 URL 디코딩 후 base64 디코딩 필요
- NotBefore와 NotOnOrAfter 사이에 현재 시간이 없으면 인증 거부 — 서버 간 시간 차이가 5분 이상이면 Assertion이 유효하지 않음. SP와 IdP 서버 모두 NTP 동기화 상태 확인 필요
- SP-initiated 흐름인데 InResponseTo가 없으면 — IdP-initiated 응답이 온 것. CSRF 보호를 위해 SP가 생성한 requestID와 InResponseTo가 일치해야 하며, 없으면 SP가 해당 응답을 거부해야 함
OAuth Authorization Code를 access_token으로 교환합니다. 실제 OAuth 서버(Keycloak 또는 소셜 로그인 제공자) 정보로 교체합니다.
# Keycloak 로컬 테스트용 token 교환
curl -X POST http://localhost:8080/realms/my-company/protocol/openid-connect/token \
  -H "Content-Type: application/x-www-form-urlencoded" \
  -d "grant_type=authorization_code" \
  -d "code=AUTH_CODE" \
  -d "client_id=my-client" \
  -d "client_secret=my-secret" \
  -d "redirect_uri=https://our-app.com/oauth/callback"

# access_token JWT 디코딩 (내용 확인)
ACCESS_TOKEN="받은_ACCESS_TOKEN"
echo "$ACCESS_TOKEN" | cut -d. -f2 | base64 -d 2>/dev/null | python3 -m json.tool
# payload에 sub(사용자 ID), exp(만료시간), scope 등 확인
curl -X POST https://auth.example.com/oauth/token -d 'grant_type=authorization_code&code=AUTH_CODE&client_id=CLIENT&redirect_uri=...'- token 교환 응답에서 access_token 필드를 먼저 확인 — 없으면 error 필드를 찾아 원인 파악. "invalid_grant"는 code가 만료됐거나 이미 사용된 것(Authorization Code는 1회용)
- expires_in이 3600(1시간)이면 일반적인 수명 — 300초(5분) 이하면 Access Token이 너무 짧아 갱신 로직 필수. 86400(24시간) 이상이면 보안상 권장하지 않음
- sub가 있고 scope에 요청한 권한이 포함됐는데 API 호출 시 403이 나오면 — scope 값은 있지만 리소스 서버에서 별도 권한 매핑을 하는 경우. 리소스 서버 로그에서 authorization 거부 원인 확인
트러블슈팅
원인: SP가 로그인 완료 후 세션 쿠키를 브라우저에 저장했지만, 다음 요청 시 브라우저가 쿠키를 전달하지 않아 SP가 미인증으로 판단합니다. 주로 IdP가 다른 도메인에 있을 때 Cross-Site 리다이렉트 후 쿠키의 SameSite 속성 문제로 발생합니다.
# 브라우저 개발자 도구 Application → Cookies에서 세션 쿠키 확인
# SameSite=Strict 또는 SameSite=Lax이면 cross-site 리다이렉트 후 쿠키 미전달

# 앱 서버 세션 쿠키 설정 확인 (Tomcat 예시)
grep -r "SameSite\|Secure\|HttpOnly" /opt/tomcat/conf/context.xml

# Spring Boot의 경우 application.yml 확인
grep -A 5 "cookie" application.yml

# 해결: SameSite=None; Secure 설정 (HTTPS 필수)
# Tomcat context.xml
# <CookieProcessor sameSiteCookies="none" />

# Spring Boot application.yml
# server:
#   servlet:
#     session:
#       cookie:
#         same-site: none
#         secure: true

# Nginx에서 Set-Cookie 헤더에 SameSite 추가 (앱 수정 없이)
location /saml/acs {
    proxy_pass http://backend:8080;
    proxy_cookie_flags ~ secure samesite=none;
}

# 변경 후 브라우저 쿠키 삭제하고 재시도
원인: IdP-initiated 흐름으로 SAML Response가 왔는데 SP가 SP-initiated만 허용하도록 설정된 경우입니다. SP-initiated 흐름에서는 SP가 생성한 AuthnRequest의 ID가 Response의 InResponseTo에 담겨 오는데, IdP-initiated 응답에는 이 값이 없습니다. SP가 InResponseTo를 필수로 검증하면 거부합니다.
# SP 로그에서 에러 확인
grep -r "InResponseTo\|Replay\|unsolicited" /var/log/app/ | tail -20

# SAML Response에 InResponseTo 있는지 확인
echo "$SAML_RESPONSE" | base64 -d | xmllint --format - 2>/dev/null \
  | grep "InResponseTo"
# 없으면 IdP-initiated 응답

# 해결 방법 1: SP에서 IdP-initiated 허용 설정
# Spring Security SAML의 경우
# saml2.relyingparty.registration.adfs.asserting-party.want-authn-requests-signed=false
# 또는 unsolicited response 허용 설정

# 해결 방법 2: IdP에서 SP-initiated 흐름만 사용하도록 설정 변경
# (IdP 관리자와 협의)

# 해결 방법 3: SP가 AuthnRequest 생성 시 ID를 세션에 저장하고
# Response 수신 시 매핑 검증하는 로직 확인
심화 — 로그인은 되는데 왜 자꾸 튕기나: 토큰 갱신의 함정
심화: OAuth 토큰의 수명주기 — access 만료, refresh 회전, 그리고 invalid_grant
로그인 성공은 시작일 뿐입니다. 실제 운영에서 사용자를 괴롭히는 건 "한동안 잘 쓰다 갑자기 튕기는" 세션 문제이고, 그 대부분은 토큰 갱신 설계에서 옵니다. access token과 refresh token이 각각 어떻게 살고 죽는지를 알아야 합니다.
- access token은 짧게 산다: 자원 서버는 access token의 서명과 만료(
exp)만 보고 상태 없이(stateless) 통과시킵니다. 덕분에 빠르지만, 한 번 발급된 토큰은exp까지 유효해 즉시 폐기(revocation)가 잘 안 먹습니다 — 그래서 수명을 짧게(분~시간) 둡니다. - refresh token으로 갱신한다: access가 만료되면 클라이언트가 refresh token을 token 엔드포인트에 제출해 새 access를 받습니다. refresh는 길게 살고 더 민감하므로 안전한 서버 저장소에 둡니다.
- refresh는 흔히 회전(rotation)한다: 보안을 위해 많은 IdP가 "refresh를 한 번 쓰면 새 refresh를 발급하고 옛 것을 무효화"합니다. 게다가 옛 refresh가 다시 제출되면 이를 탈취 신호로 보아 그 사용자의 토큰 패밀리 전체를 폐기하기도 합니다(reuse detection).
- 그래서 동시 갱신이 위험하다: 탭 여러 개나 동시 요청이 같은 refresh로 동시에 갱신을 시도하면, 첫 요청만 성공하고 나머지는 이미 무효가 된 옛 refresh를 내밀어
invalid_grant를 받습니다. reuse detection이 켜져 있으면 전체 폐기로 이어져 사용자가 강제 로그아웃됩니다.
결론적으로 토큰 갱신은 "동시에 하나만" 일어나도록 직렬화하고, 갱신된 refresh를 원자적으로 교체하며, invalid_grant는 조용한 재인증으로 폴백해야 안정적입니다. 회전을 끄는 것은 보안 후퇴라 답이 아닙니다.
상황: 로그인은 잘 됩니다. 그런데 한동안 쓰던 사용자가 갑자기 세션이 끊겨 다시 로그인해야 합니다. 백엔드의 토큰 갱신 로그에 {"error":"invalid_grant"}가 드문드문 찍히고, 탭을 여러 개 열거나 새로고침이 잦은 사용자에게서 더 자주 발생합니다.
원인: IdP가 refresh token rotation을 켜 둔 상태입니다. access token이 만료되는 순간, 앱의 여러 인스턴스(여러 탭·동시 API 호출)가 같은 refresh token으로 동시에 갱신을 시도합니다. 첫 요청이 새 refresh를 받으며 옛 것을 무효화하면, 근소한 차이로 뒤따른 요청들은 이미 무효가 된 옛 refresh를 제출해 invalid_grant를 받습니다. IdP의 reuse detection이 이를 탈취로 간주해 토큰 패밀리 전체를 폐기하면 사용자는 그 자리에서 튕깁니다.
진단: IdP 설정에서 refresh rotation과 reuse detection이 켜져 있는지 확인합니다. 백엔드 로그에서 invalid_grant 발생 시각 주변에 같은 사용자의 갱신 요청이 여러 건 몰렸는지, 즉 동시 refresh가 있었는지 봅니다. 클라이언트가 토큰 저장·갱신을 인스턴스마다 중복 실행하는 구조인지도 점검합니다.
해결: 토큰 갱신을 직렬화합니다 — 뮤텍스나 분산 락으로 같은 세션의 refresh는 한 번에 하나만 나가게 하고, 나머지 대기 요청은 그 결과(새 access)를 공유받게 합니다. 갱신된 refresh는 공유 저장소에 원자적으로 교체하고, invalid_grant가 나면 조용히 재인증으로 폴백합니다. 서버 시계는 NTP로 동기화해 exp 판정이 흔들리지 않게 합니다. rotation은 보안 기능이므로 끄지 않습니다.
실제 업무에서 이 지식이 쓰이는 상황:
SSO 연계는 개발팀 혼자 해결하기 어렵습니다. IdP 관리자(AD 담당자, 정보보안팀), SP 개발팀, 인프라 팀이 함께 설정을 맞춰야 합니다.
SSO 연계 신규 구성 시 체크리스트:
# 1. SP 메타데이터 준비 및 IdP 담당자에게 전달
# Entity ID, ACS URL, SLO URL, SP 인증서

# 2. IdP 메타데이터 수신 후 SP 설정
curl -s https://idp.company.com/FederationMetadata/2007-06/FederationMetadata.xml \
  | xmllint --format - | grep -E "EntityID|SingleSignOnService|X509Certificate"

# 3. 서버 시간 동기화 확인 (SAML 어설션 유효 시간에 영향)
timedatectl status | grep "System clock synchronized"

# 4. SP 설정: Entity ID가 IdP에 등록된 것과 정확히 일치하는지
# 공백, 슬래시 끝 여부까지 동일해야 함

# 5. ACS URL이 HTTPS이고 외부에서 접근 가능한지 확인
curl -vI https://our-app.com/saml/acs 2>&1 | grep -E "HTTP/|SSL"
OAuth/OIDC 연동 디버깅:
# IdP Well-known 설정에서 정확한 엔드포인트 확인
curl -s https://idp.example.com/.well-known/openid-configuration \
  | python3 -m json.tool | grep endpoint

# state 값 불일치 시 (CSRF 방지 파라미터)
# 로그인 시작 시 생성한 state와 callback에서 받은 state 비교
# 불일치하면 CSRF 공격으로 간주하여 차단 → 세션 스토어 확인 필요
SSO는 한 번 잘 구성하면 사용자 경험이 크게 좋아지지만, 설정 불일치에 의한 장애는 원인 파악이 어렵습니다. SAML Response를 직접 디코딩해서 내용을 확인하는 능력만 있어도 대부분의 SSO 장애를 빠르게 해결할 수 있습니다.
명령어·단축키 빠른 참조
SAML Response 디코딩과 OAuth 토큰 교환·SSO 장애 진단에 쓴 명령을 모았습니다. "예" 열의 조합을 그대로 써도 됩니다.
| 명령어/단축키 | 용도 | 자주 쓰는 예 |
|---|---|---|
base64 -d + xmllint --format | SAMLResponse 디코드·XML 정렬 출력 | echo "$SAML" | base64 -d | xmllint --format - |
grep -E "NameID|NotOnOrAfter" | 어설션 핵심 필드·유효시간 확인 | ... | grep -E "NameID|Attribute|InResponseTo|NotOnOrAfter" |
timedatectl status / date -u | 어설션 만료 오판용 서버 시간 확인 | timedatectl status | grep synchronized / date -u |
curl -X POST .../token | OAuth code→access_token 교환 | -d "grant_type=authorization_code" -d "code=..." -d "client_secret=..." |
cut -d. -f2 + base64 -d | access_token(JWT) payload 디코드 | echo $TOKEN | cut -d. -f2 | base64 -d | python3 -m json.tool |
curl -H "Authorization: Bearer" | 발급 토큰으로 userinfo 조회 | curl -H "Authorization: Bearer $TOKEN" .../userinfo |
curl .../saml/descriptor | IdP SAML 메타데이터 조회 | curl -s URL | xmllint --format - | grep -E "EntityID|X509Certificate" |
curl .../.well-known/openid-configuration | OIDC 엔드포인트 자동 확인 | curl -s URL | python3 -m json.tool | grep endpoint |
curl -vI | ACS URL의 HTTPS·외부 접근성 확인 | curl -vI https://our-app.com/saml/acs 2>&1 | grep -E "HTTP/|SSL" |
grep -r InResponseTo | SP 로그에서 SSO 거부 원인 추적 | grep -r "InResponseTo|unsolicited" /var/log/app/ |
docker run keycloak | 로컬 테스트용 IdP 기동 | docker run -p 8080:8080 -e KEYCLOAK_ADMIN=admin quay.io/keycloak/keycloak start-dev |
관련 모듈로 더 깊이:
- RESTful API 구조와 curl/Postman 테스트 실무 — OAuth 토큰으로 보호되는 API의 인증 헤더와 요청 흐름의 기반
- 트래픽 제어와 이벤트 기반 연계 구조 — 게이트웨이에서 토큰 검증과 인증을 중앙화하는 구조
- SMTP 메일과 SMS 게이트웨이 운영 실무 — IdP 미연동 사용자에게 알림·인증 메일을 보내는 채널 연계
다음 모듈에서는 SMTP 메일 발송과 SMS 게이트웨이 연동 — 운영 알림 채널 구성 실무를 다룹니다.