일요일 새벽 3시, 모니터링 알림이 울립니다. "HTTPS 접속 실패 — 인증서 만료." Let's Encrypt 인증서가 어젯밤 자정에 만료됐고 자동 갱신 cron이 환경변수 문제로 90일 전부터 조용히 실패하고 있었습니다. 사용자들은 "보안 연결이 아닙니다" 경고창을 보고 있고, 구매 전환율이 0%입니다. 인증서가 무엇인지, 어떻게 갱신되는지, 그리고 이런 사고를 처음부터 막는 방법을 알아야 합니다.
SSL/TLS 인증서 관리
"보안 연결이 아닙니다" 경고 하나로 사용자가 다 도망갑니다. 더 나쁜 건 인증서가 새벽 3시에 만료되어 서비스가 통째로 다운되는 것입니다. 이 모듈에서는 인증서 발급부터 자동 갱신까지 실무에서 쓰는 방식을 다룹니다.
인증서 관리의 핵심은 자동화입니다. 사람이 기억해서 갱신하는 건 언젠가 반드시 실패합니다.
- 1TLS 인증서 구조(공개키·CA 체인·신뢰 모델)를 설명할 수 있다
- 2openssl로 인증서를 생성·조회·검증할 수 있다
- 3내부망/개발 환경용 자체 서명 인증서를 발급할 수 있다
- 4Let's Encrypt + certbot로 인증서를 무료로 자동 갱신할 수 있다
- 5인증서 만료를 모니터링해 장애를 예방할 수 있다
TLS 인증서 동작 원리 — 3분 요약
브라우저와 서버가 암호화 연결을 여는 TLS 핸드셰이크는 인사 → 인증서 검증 → 키 합의 → 암호화 통신 순으로 진행됩니다. 전체 단계를 그림으로 먼저 봅니다.
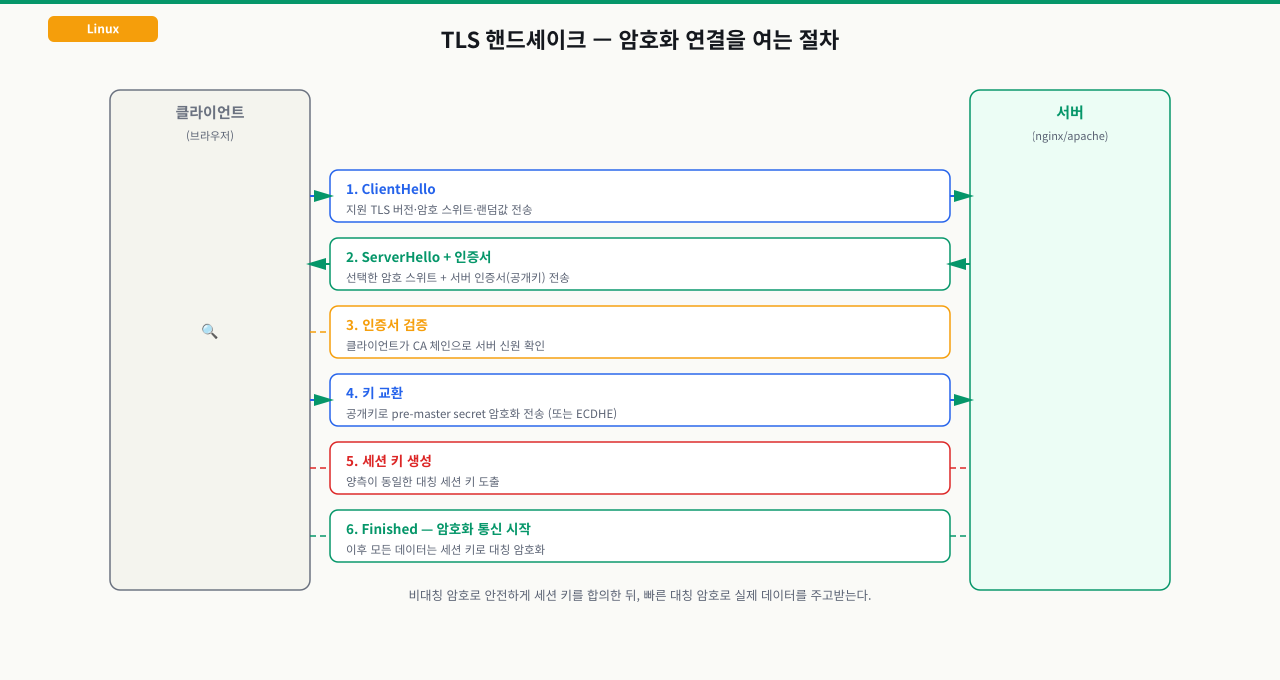 확대
확대
클라이언트 (브라우저)                 서버
        │                              │
        │──── ClientHello ────────────>│
        │<─── ServerHello + 인증서 ───│  ← 서버가 공개 인증서 전송
        │                              │
        │  [인증서 검증]               │
        │  1. 만료일 확인              │
        │  2. 도메인명 일치 확인       │
        │  3. CA 서명 검증 (신뢰 체인) │
        │                              │
        │──── 대칭키 교환 (암호화됨) ─>│
        │<──── 암호화된 통신 시작 ─────│
인증서 파일 구성:
certificate.crt   ← 공개 인증서 (서버가 브라우저에 전송)
private.key       ← 개인키 (절대 외부 유출 금지!)
ca-bundle.crt     ← 중간 CA 체인 (신뢰 연결용)
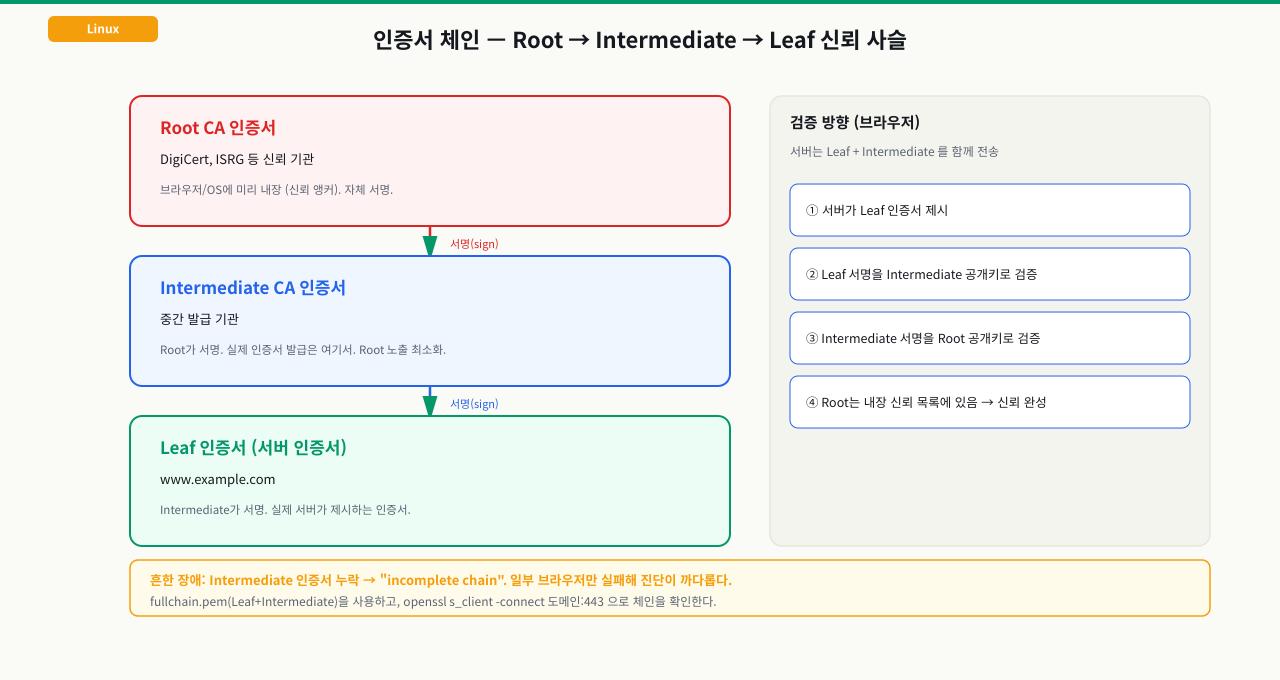
ca-bundle.crt가 왜 필요한지는 인증서 신뢰 체인을 보면 분명해집니다. 서버 인증서(Leaf)는 Intermediate CA가, Intermediate는 Root CA가 서명하고, Root는 브라우저에 미리 내장되어 있습니다.
 확대
확대
Nginx 설정 예시:
server {
    listen 443 ssl;
    ssl_certificate     /etc/ssl/certs/example.crt;
    ssl_certificate_key /etc/ssl/private/example.key;
    ssl_trusted_certificate /etc/ssl/certs/ca-bundle.crt;
}
openssl — 인증서 생성과 조회
# ── 자체 서명 인증서 생성 (개발/내부망용) ──

# 1. 개인키 생성 (RSA 2048비트)
openssl genrsa -out server.key 2048

# 2. 인증서 서명 요청 (CSR) 생성
openssl req -new -key server.key \
  -subj "/C=KR/ST=Seoul/O=MyCompany/CN=myserver.internal" \
  -out server.csr

# 3. 자체 서명 인증서 발급 (365일)
openssl x509 -req -days 365 \
  -in server.csr -signkey server.key \
  -out server.crt

# ── 한 번에 생성 (개발환경 빠른 세팅) ──
openssl req -x509 -nodes -days 365 \
  -newkey rsa:2048 \
  -keyout server.key \
  -out server.crt \
  -subj "/CN=localhost"
# ── 인증서 정보 조회 ──

# 만료일 확인
openssl x509 -in server.crt -noout -dates
# notBefore=Apr 14 00:00:00 2026 GMT
# notAfter=Apr 14 00:00:00 2027 GMT

# 상세 정보 (발급자, 도메인, 알고리즘)
openssl x509 -in server.crt -noout -text | head -40

# ── 원격 서버 인증서 실시간 조회 ──
openssl s_client -connect google.com:443 -servername google.com < /dev/null 2>/dev/null \
  | openssl x509 -noout -dates

# 만료까지 남은 일수 계산
openssl s_client -connect example.com:443 < /dev/null 2>/dev/null \
  | openssl x509 -noout -checkend 2592000  # 30일(2592000초) 내 만료 여부
# Certificate will not expire  ← 안전
# Certificate will expire      ← 곧 만료!
Let's Encrypt + certbot — 무료 자동 갱신
# ── Nginx 플러그인으로 자동 발급 + 설정 ──
sudo certbot --nginx -d example.com -d www.example.com

# ── Standalone 모드 (Nginx 없이) ──
sudo certbot certonly --standalone -d example.com
# 발급된 파일 위치:
# /etc/letsencrypt/live/example.com/fullchain.pem  ← 인증서 + 체인
# /etc/letsencrypt/live/example.com/privkey.pem    ← 개인키

# ── 인증서 목록 확인 ──
sudo certbot certificates

# ── 갱신 테스트 (실제 갱신 안 함) ──
sudo certbot renew --dry-run

# ── 수동 갱신 ──
sudo certbot renew

# ── 갱신 후 Nginx 리로드 자동화 ──
sudo certbot renew --deploy-hook "systemctl reload nginx"
자동 갱신 설정 (systemd timer — Ubuntu 20.04+):
# certbot 설치 시 자동으로 생성됨
systemctl status certbot.timer
systemctl list-timers | grep certbot

# 수동으로 timer 설정 (없을 경우)
# /etc/systemd/system/certbot-renew.service
# /etc/systemd/system/certbot-renew.timer
# → 다음 모듈(systemd-timer)에서 자세히 다룸
openssl로 자체 서명 인증서 생성 (개발환경용)
openssl req -x509 -nodes -days 365 -newkey rsa:2048 -keyout /tmp/dev.key -out /tmp/dev.crt -subj '/CN=localhost'예상 출력
Generating a RSA private key
....................+++++
writing new private key to '/tmp/dev.key'
생성된 인증서 정보 확인 (만료일, 도메인)
openssl x509 -in /tmp/dev.crt -noout -text | grep -E 'Not After|Subject:|Issuer:'예상 출력
        Issuer: CN = localhost
        Subject: CN = localhost
Not After : Jun 14 00:00:00 2027 GMT원격 서버 인증서 만료일 조회
openssl s_client -connect google.com:443 -servername google.com </dev/null 2>/dev/null | openssl x509 -noout -dates예상 출력
notBefore=Apr  1 00:00:00 2026 GMT
notAfter=Jun 24 00:00:00 2026 GMT
인증서 30일 내 만료 여부 자동 체크
openssl x509 -in /tmp/dev.crt -noout -checkend 2592000 && echo 'OK: 30일 이상 남음' || echo 'WARN: 30일 내 만료!'예상 출력
OK: 30일 이상 남음
certbot 자동 갱신 타이머 상태 확인
systemctl list-timers 2>/dev/null | grep -i certbot || echo 'certbot timer 없음 (certbot 미설치 또는 수동 갱신 환경)'예상 출력
Sat 2026-06-15 12:00:00 UTC  12h left  Fri 2026-06-14 12:00:00 UTC  11h ago certbot.timer
(또는 'certbot timer 없음' 메시지)
- openssl x509 -in cert.crt -noout -dates 출력에서 먼저 notAfter 날짜를 확인하고, 그 다음 Subject와 SAN(Subject Alternative Name) 필드로 도메인 일치 여부 확인 — 도메인 불일치는 만료와 동일하게 경고 유발
- 인증서 잔여일 기준: 30일 이상=정상, 14일 미만=즉시 갱신 필요, 7일 미만=사고 직전 — certbot renew --dry-run 이 정상 출력이면 실제 갱신도 성공 가능
- certbot renew 성공인데 브라우저에서 여전히 만료 인증서가 보이면 → nginx/apache reload 미실행(--deploy-hook 추가 필요), openssl s_client 연결 자체 실패이면 → 443 포트 방화벽 차단을 의미
$ sudo certbot certonly --standalone -d example.com
# ...
# Problem binding to port 80: Could not bind to IPv4 or IPv6.
원인: Standalone 모드는 임시 웹서버를 80 포트에 띄워 도메인 인증을 합니다. Nginx가 이미 80 포트를 점유 중이면 충돌.
해결 방법:
# 방법 1: Nginx 플러그인 사용 (권장)
sudo certbot --nginx -d example.com
# Nginx 설정을 자동으로 수정해서 인증 처리

# 방법 2: Nginx 중지 후 standalone
sudo systemctl stop nginx
sudo certbot certonly --standalone -d example.com
sudo systemctl start nginx

# 방법 3: webroot 모드 (Nginx 실행 중 유지)
sudo certbot certonly --webroot \
  -w /var/www/html \
  -d example.com
# Nginx가 /.well-known/acme-challenge/ 를 서빙하면서 인증
webroot 모드 Nginx 설정 추가:
location /.well-known/acme-challenge/ {
    root /var/www/html;
}
$ curl https://example.com
# curl: (35) OpenSSL SSL_connect: Connection reset by peer

# 또는 브라우저에서 SSL_ERROR_RX_RECORD_TOO_LONG
원인: Nginx가 443 포트에서 SSL 없이 평문 HTTP를 응답하거나, 방화벽이 443을 막고 있음.
# 확인 1: Nginx가 443에서 SSL을 켰는지 확인
grep -n "listen 443\|ssl_certificate" /etc/nginx/sites-enabled/*
# listen 443 ssl; 이어야 함 (ssl 빠지면 HTTP로 응답)

# 확인 2: 443 포트 방화벽
sudo ufw status | grep 443
sudo iptables -L -n | grep 443

# 확인 3: 실제로 무엇이 443에서 리스닝하는지
ss -tlnp | grep :443
실무 인증서 모니터링 스크립트
#!/bin/bash
# /usr/local/bin/check-ssl-expiry.sh
# 인증서 만료 30일 전 알림 (cron으로 매일 실행)

DOMAINS=("example.com" "api.example.com" "admin.example.com")
WARN_DAYS=30
LOG="/var/log/ssl-check.log"

for domain in "${DOMAINS[@]}"; do
    expiry=$(openssl s_client -connect "$domain:443" -servername "$domain" \
      < /dev/null 2>/dev/null | openssl x509 -noout -enddate 2>/dev/null \
      | cut -d= -f2)

    if [ -z "$expiry" ]; then
        echo "[$(date)] ERROR: $domain — 인증서 조회 실패" >> "$LOG"
        continue
    fi

    expiry_epoch=$(date -d "$expiry" +%s)
    now_epoch=$(date +%s)
    days_left=$(( (expiry_epoch - now_epoch) / 86400 ))

    if [ "$days_left" -lt "$WARN_DAYS" ]; then
        echo "[$(date)] WARN: $domain 인증서 ${days_left}일 후 만료 ($expiry)" >> "$LOG"
        # 슬랙/이메일 알림 추가 가능
    else
        echo "[$(date)] OK: $domain ${days_left}일 남음" >> "$LOG"
    fi
done
인증서 관련 실무 체크리스트:
# 1. 인증서 파일 권한 확인 (개인키는 root만 읽어야 함)
ls -la /etc/letsencrypt/live/example.com/
# privkey.pem은 600 또는 640이어야 함

# 2. TLS 버전 확인 (TLS 1.0/1.1 차단)
openssl s_client -connect example.com:443 -tls1
# handshake failure → 정상 (구버전 차단됨)

# 3. Mixed content 확인 — HTTPS 페이지에서 HTTP 리소스 로드 없는지
# 브라우저 개발자 도구 > Console에서 확인
인증서 만료로 서비스가 다운되는 사고는 100% 예방 가능합니다. 자동 갱신 + 모니터링 둘 다 있어야 진짜 안전합니다.
다음 모듈에서는 Cron과 systemd timer — 반복 작업을 자동화하고 실행 이력을 추적하는 방법을 다룹니다.